Andy's iOS Journal

Day 12 iOS Foundations M2 L12 JSON Parsing

This was a great lesson on how JSON parsing works. It also explains how to load any type of data from a file in the project.

  • Apr 4, 2021

Grab data from path inside a project

let pathString = Bundle.main.path(forResource: "filename", ofType: "extension")
let url = URL(fileURLWithPath: path)
let data = try Data(contentsOf: url) // <- this throws requires a do-try-catch block
//can call a decoder once we have the data -- see below  <- this also throws

do-try-catch block

  • required for
    • grabbing contents of a url
    • parsing JSON data
    • any object that requires a throw
      • Error Call can throw, but it is not marked with 'try' and the error is not handled
do {
let data = try ...

} catch {
  print(error)
}

JSONDecoder

  • Create a class to pull in the json
  • id should start out as optional
    • can assign ids after parsing (UUID())
  • Make it decodable
  • mark Decodable Protocal ← the class above with .self
let decoder = JSONDecoder()

                do {
                    try decoder.decode([Recipe].self, from: data)

                } catch {
                    print(error)
                }

            } catch {
                print(error)
            }

Day 13 iOS M2L13 The Recipe List App

  • Apr 5, 2021

This was a very satisfying tutorial, So many concepts got consolidated for me.

static func in a class

If you make a function static in a class you can call it directly without making an instance of it.

self.recipes = DataService.getLocalData()

Guard let

This is how it was taught in the lesson.

guard pathString != nil else { return [Recipe]() }

This is how I have seen it in other tutorials.

guard let path = pathString else { return [Recipe]() }

A lot of the times it is just {return} as this would represent a major probleme and you want to know about it.

The benefit of the first is that you don’t have to rename the variable. The benefit of the second is that it seems cleaner to write to me.

Guard let vs if let

The equivelent to the guard let statement above would be

if let path = pathString {

// code for url, decoder, id generation and then setting to a Published variable.

}
  • if let nests its scope meaning that the path variable is only available within the scope of the {...}
  • guard let the else statement must exit the current scope
    • So if you put a guard let statement at the top of a function you want to call you can verify that the optional you have is not nil before proceeding or otherwise return or set an empty variable.

Debugging and break points

I never fully appreciated break points until this lesson. The step-over and resume buttons above the debug console are awesome.

  • po objectname can be used to printout objects as you step through a for loop or step through the code.
  • drag a break point off the side to remove it

guard let is also really good because people know with a guard statement that this is something essential (we need this to work to continue) as opposed to an if statement, that could be any decision about something

1 Like

Day14-iOS-M2L15-Recipe-DetailView

  • Apr 7, 2021

Remember Navigation view from M2L3 where we only got a “Destination” string?

 NavigationView {
            List(array, id: \.self) { arrayElement in
                NavigationLink(
                    destination: Text("Destination"),

                    label: {
                        Text(arrayElement)
                    })

            }.navigationTitle(Text("My List"))

Turns out that the destination: part can specify an entire view to load instead of just text. This implies there is a way to also point to different views say with a button.

List(model.recipes) { r in
  NavigationLink(
      destination: RecipeDetailView(recipe: r),
      label: {
          HStack(spacing: 20) {
              Image(r.image)
                  .resizable()
                  .scaledToFill()
              Text(r.name)
          }
      })
}

In this case we are passing a recipe variable into the destination view struct

Inside that view struct we define a variable to hold the recipe or whatever we decide to pass in and is used to create the view struct.

struct RecipeDetailView: View {

    var recipe:Recipe

    var body: some View {


}

Other useful concepts

  • //MARK will create sections you can jump to by clicking on the struct name at the top
    • look for the App > view > viewController > structName
  • Divider() will place a divider in your view
  • .navigationBarTitle(recipe.name) after ScrollView

Day15-iOS-M2L15-challenge.

  • Apr 9, 2021

I was making the challenge, harder than it needed to be. Inside the ForEach(model.pizzas) { r in statement it is possible to display views that take in the r variable in this case. This could really make interpreting the ContentView if multiple subviews were created and then called and supplied the r data variable to populate the subviews.

Day16-iOS-M2L16-finalChallenge

  • Apr 10, 2021

Spoiler Warning: This entry contains solutions to some of the challenges I faced while doing this challenge. Not the complete code

Learned today that NavigationView is just another container like ScrollView or VStack Order of course is important for containers but I get the impression that NavigationView tends to be near or at the Base of a view or collection of containers.

The NavigationLink that is often associated with NavigationView can be used on any object not just inside a List. In this way we can create a button that then takes you to a different view or text (as in a list) or an image. This was not clear in tutorials up to this point and required that I google this and learn more about NavigationView and NavigationLink. I can imagine this being very frustrating to new learners but an interesting approach to teaching as it forces us to find way to get the information we need to solve the challenge using whatever resource we can find, which is exactly what we will do when we have a project we want to start building and don’t know where to start.


import SwiftUI

struct ContentView: View {
    var body: some View {
        NavigationView {
            ScrollView {

                NavigationLink(
                    destination: Text("Destination"),
                    label: {
                        Image("Leaf.png")
                            .resizable()
                            .scaledToFill()
                    })//NavigationLink

            }//ScrollView
        }//NavigationView
    }//Body
}//Struct End

Adding a json file.

I tried just to create a new swift file and then change the file ending to .json. This did not work. My pathString always returned nil

Solution

  • Make sure Target Membership is checked in File inspector
  • Make sure Text encoding is Unicode (UTF-8)
  • Verify it is listed in the bundle resources
    • main app (click top of the folder that is your app name)
    • Build phases tab
    • Copy Bundle Resources
      • click on the + to add it to the list.

This took me well over an hour to figure out.

Clearing the cache

Sometimes Xcode does not behave nicely or you don’t know why code isn’t working, try clearing the cache.

command, shift K

Previews are their own view struct

This should be obvious but it isn’t always clear that extra code may be needed to make the preview struct to display in a manner that is similar to the ContentView struct if you move a chunk of code outside the content view. In my case, I had moved most of the card code into its own view struct and the preview struct inside this view would only show one card at a time which skews what it looks like if I want to make additional edits. So I can mimic what the app does by adding some of the missing components like ScrollView and VStack

struct Card_Previews: PreviewProvider {
    static var previews: some View {
        let model = QuoteModel()
        ScrollView{
            VStack {
            Card(q:model.quotes[0])
            Card(q:model.quotes[1])
            Card(q:model.quotes[2])
            Card(q:model.quotes[3])
            }
        }

    }
}

Day-17-TabView

  • Apr 17, 2021
  • iOS Foundations Module 4

I went through the git repo tutorials by @mikaelacaron and got i mostly working. I had been version controlling by placing the contents into GitHubs Atom program. Nice to find another way to do it.

Tab Views look pretty straightforward

  1. Create a tab view and in it create the tabs
  2. modify the starting page to be this new view controller in the WindoGroup container
@State var tabIndex = 0  // this will give the index tab value

TabView (selection: $tabIndex) {  //tabIndex requires the $ symbol in order for the State var tabIndex can send information back to this tabview
    //View Objects go in here (what is in the view)

     Text("tab1")
          .tabItem {
              // this is where you describe the tab (view contents)
              VStack {
              Image(systemName: "star")
              Text("tab 1")
            }//VStack
          }//tabItem
          .tag(1)
}

What parts didn’t you get working with git?

I am used to managing projects from the command line using git. Sometimes it is hard to get the xcode project under source control. I was getting the error, “it is already under source control” I have it working now and it will probably be easier with a new project.

You’re getting that error because you already created the git repo. All you should be doing afterwards is committing code

You can use the source navigator to make commits. You don’t need to create a new repo (if you already made one with the command line)

Day-18-geometryReader

  • Apr 19, 2021
  • iOS Foundations Module 4 Lesson 4

GeometryReader

Geometry reader is a container that acts similar to a ZStack but can provide position information.

GeometryReader { geo in
  Rectangle()
    .frame(width: geo.size.width)
    geo.frame(in: .local).minX  // get the location in local or global positioning
}

Shapes

  • Circle()
  • Rectangle()

Gestures

Modifier that can be applied to an object like the Circle or Rectangle or container.

.onTapGesture {
  // code to execute onTap gesture
}

Positioning

  • .padding
  • .offSet

Day-19-environmentObject

  • Apr 23, 2021
  • iOS Foundations Module 4 Lesson 5,6

The environmentObject modifier can be attached to a view object to supply data to all downstream views

So at the top level view code may look like this with RecipeModel() containing the data we want to use in the downstream views.

TabView {

}
.environmentObject(RecipeModel())

Each downstream view will need to have a line of code that defines a variable that the environmentObject data can be placed.

@EnvironmentObject var model:RecipeModel

Something to keep in mind: I read that environmentObjects are kept in memory for the lifetime of the app, which means, we want to be careful the type can quantity of data we store in an environmentObject.

This website had a really great explanation between @State, @Binding @EnvironmentObject and when to use them.

Day-20-challenge

  • Apr 24, 2021
  • iOS Foundations Module 4 Lesson 6 Challenge

Spoiler Warning lots of hints on how I solved this challenge below.


Create an app with 2 tabs that displays person information.

When creating a class, either the class has to have a default init function

init() {
  //code here that will create default values for all variables in the class
}

or

All the elements in the class should be optional except say the Id.

class Person: Identifiable {

    var id = UUID()
    var name:String?
    var address:String?
    var company:String?
    var experience:Int?

}

What we want here though is actually a struct not a class as it makes it easier to create a people Array of Persons.

Error: invalid mode 'kCFRunLoopCommonModes'

StackOverflow suggests this is just a warning that Apple is working on and can be safely ignored.

toggles object

We can only pass one object to the environmentObject modifier that we use on the TabView. So we need to create an object that can hold the for bool variables.

class toggles: ObservableObject {
    @Published var showName = true
    @Published var showAddress = true
    @Published var showCompany = false
    @Published var showExperience = true
}

Those variables need to be @Published or else the toggles won’t update the class variables and the class needs to be an ObservableObject.

I really liked how this challenged forced me to combine all the elements we have learned so far.

  • TabView
    • View Instances for FirstTab and Second Tab
  • environmentObject, @EnvironmentObject
  • ObservableObject, @Published, @State
  • Structs, arrays,
  • Lists,
  • If statements
  • Toggle
  • MVVM model

Day-21-FeatureView

  • iOS Foundations Module 4 Lesson 7 Challenge
  • Apr 25, 2021

This lesson went super fast. I had to pause it several times to catch up. I also had to find a mistake as to why my .tabViewStyle(PageTabViewStyle(indexDisplayMode: .always)) was not working properly. The dots weren’t showing up. Turned out I had placed that modifier in the wrong location. It needed to be attached to the } of TabView and I had it one curly bracket up. I have started to label all of my end brackets like this.

VStack {
  HStack {
    GeometryReader { geo in
                TabView {

                }//TabView
    } //GeometryReader
  }//Hstack
}// Vstack

At least for now this seems to make it easier for me to see the code clearly.

Things I learned

Use TabView to make swipeable cards

TabView {
  //code
}
.tabViewStyle(PageTabViewStyle(indexDisplayMode: .always))
.indexViewStyle(PageIndexViewStyle(backgroundDisplayMode: .always))

How to add a Shadow

Rectangle()
.shadow(color: Color(.sRGB, red: 0, green: 0, blue: 0, opacity: 0.5), radius: 10,x: -5, y: 5)

Review of VStack parameters

Very useful for modifying space

VStack(alignment: .leading, spacing: 0)

Day 21

Took a break and tried to make a color slider. I think it came out well.

image

Day-22-StockPickerChallenge

  • Stock Picker Challenge
  • Apr 30, 2021

While I am enjoying the tutorials, I am itching to try out my skills on a project without step by step instructions. I could start on some of my own ideas but I know they require core data and some other skills i haven’t gotten to yet. So instead I am going to dive into the Stock Picker Challenge this month with the rest of the CodeCrew group.

Basic Requirements for the Challenge:

  • Get stock data from an API
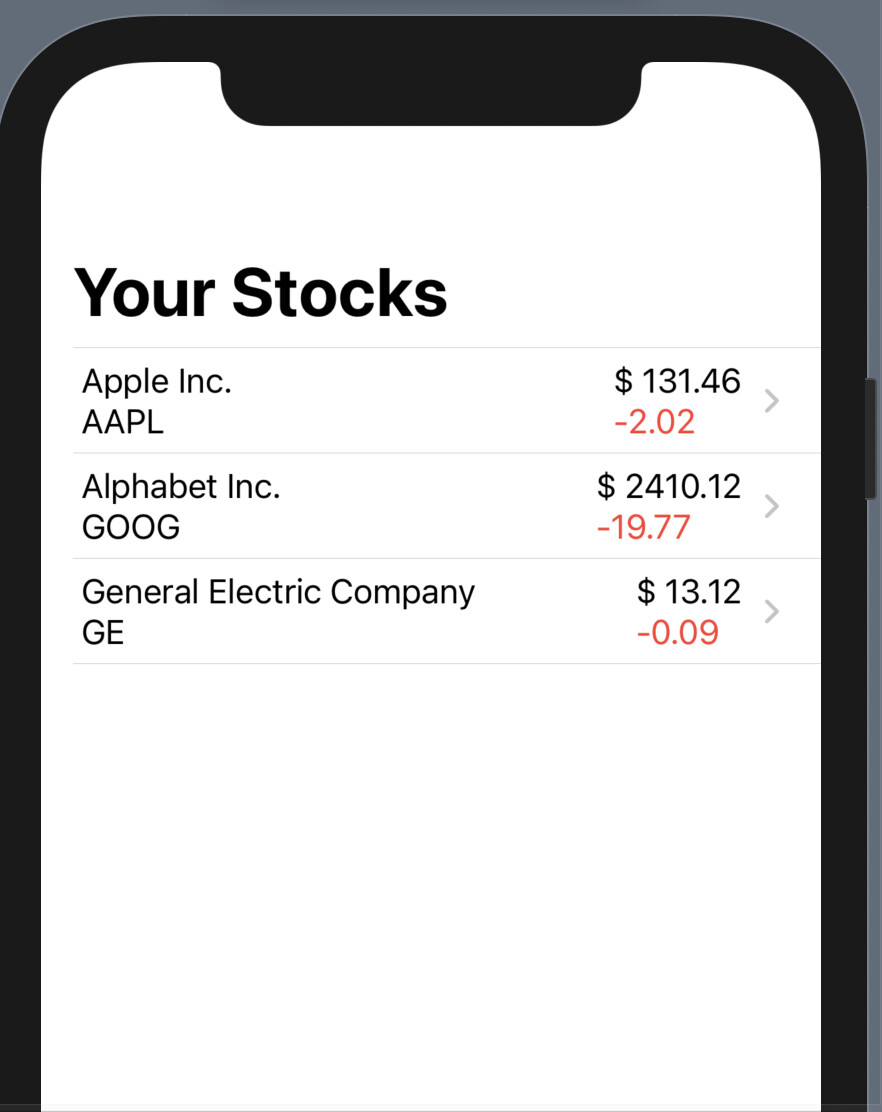
  • Display a list of stocks, with respective prices and changes in dollar amount.
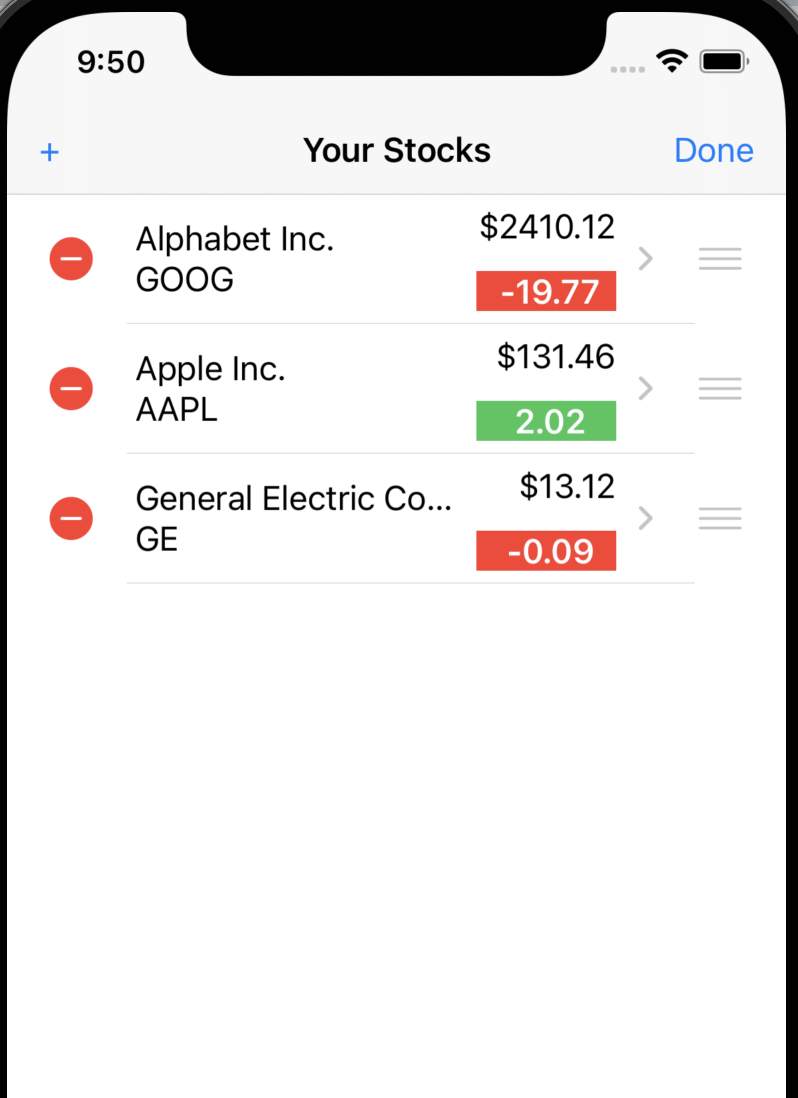
  • Be able to edit the same list of stocks, and have the option to remove and add stocks by ticker symbol.

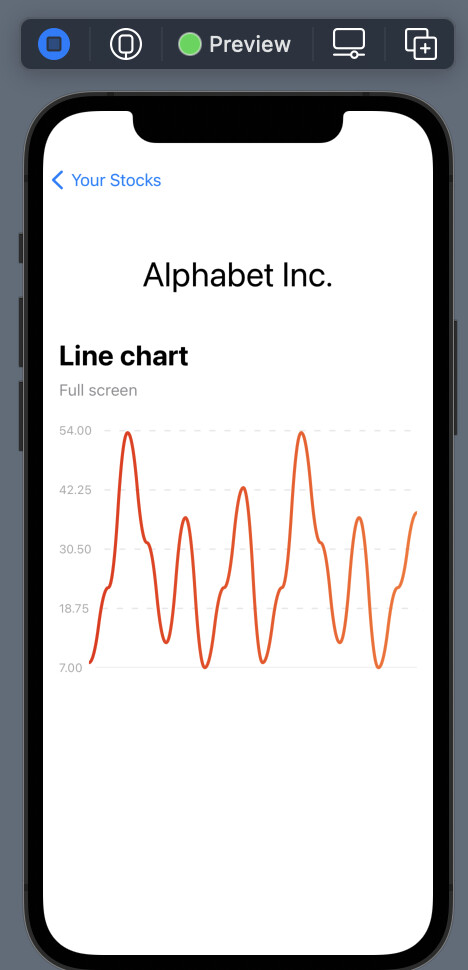
I am going to aim for this basic requirement and add in a few extra features that I am interested in learning how to do.

Since this challenge starts tomorrow, I want to make sure I can utilize the API properly

The API

Per the recommendation in the challenge, I am goign to use this Stock API

I tried using the apikey=demo and all that this key can do is apparently pull down data for stock ticker symbol AAPL. If you try to do a batch pull or any other symbol you get the following error.

{"Error Message" : "Invalid API KEY. Please retry or visit our documentation to create one FREE https://financialmodelingprep.com/developer/docs"}

The only way to get around this is to sign up for a free account. They don’t ask you for a credit card and it gives you 250 requests per day.

Sign up for a free API key here

After I signed up it said you had to verify your email but I never got an email so I signed in through my google account and was able to get to the dashboard they provide which has the api key. Once I had that everything worked as expected for single stock picker symbols. We can test this directly in the web browser and get a couple stocks to populate a json of starter stocks to explore in the App.

https://financialmodelingprep.com/api/v3/quote/GOOG?apikey=myNewShinyAPIKey

Turns out that for batch submissions you need to upgrade for the subscription package. I am not going to be doing this as this is just for fun so we are limited to single tock ticker api requests.

https://financialmodelingprep.com/api/v3/quote/GE,GOOG?apikey=myNewShinyAPIKey
{"Error Message" : "Special Endpoint : this endpoint is only for premium members please visit our subscription page to upgrade your plan at https://financialmodelingprep.com/developer/docs/pricing"}

NOTE: you have to replace myNewShinyAPIKey with the apikey from your account or it won’t work.

So we now can get one stock at a time.

GE

https://financialmodelingprep.com/api/v3/quote/GE?apikey=myNewShinyAPIKey
[ {
  "symbol" : "GE",
  "name" : "General Electric Company",
  "price" : 13.12000000,
  "changesPercentage" : -0.68000000,
  "change" : -0.09000000,
  "dayLow" : 13.08000000,
  "dayHigh" : 13.35000000,
  "yearHigh" : 14.42000000,
  "yearLow" : 5.48000000,
  "marketCap" : 115175759872.00000000,
  "priceAvg50" : 13.24200000,
  "priceAvg200" : 11.16021700,
  "volume" : 48760561,
  "avgVolume" : 76976082,
  "exchange" : "NYSE",
  "open" : 13.16000000,
  "previousClose" : 13.21000000,
  "eps" : -0.45300000,
  "pe" : null,
  "earningsAnnouncement" : "2021-04-27T12:30:00.000+0000",
  "sharesOutstanding" : 8778640234,
  "timestamp" : 1619825257
} ]

AAPL

https://financialmodelingprep.com/api/v3/quote/AAPL?apikey=myNewShinyAPIKey
[ {
  "symbol" : "AAPL",
  "name" : "Apple Inc.",
  "price" : 131.46000000,
  "changesPercentage" : -1.51000000,
  "change" : -2.02000000,
  "dayLow" : 131.06500000,
  "dayHigh" : 133.56000000,
  "yearHigh" : 145.09000000,
  "yearLow" : 71.46250000,
  "marketCap" : 2206963859456.00000000,
  "priceAvg50" : 127.59143000,
  "priceAvg200" : 125.78232000,
  "volume" : 105917721,
  "avgVolume" : 100930927,
  "exchange" : "NASDAQ",
  "open" : 131.78000000,
  "previousClose" : 133.48000000,
  "eps" : 4.44900000,
  "pe" : 29.54821600,
  "earningsAnnouncement" : "2021-04-28T16:30:00.000+0000",
  "sharesOutstanding" : 16788101776,
  "timestamp" : 1619825031
} ]

GOOG

https://financialmodelingprep.com/api/v3/quote/GOOG?apikey=myNewShinyAPIKey

[ {
  "symbol" : "GOOG",
  "name" : "Alphabet Inc.",
  "price" : 2410.12000000,
  "changesPercentage" : -0.81000000,
  "change" : -19.77000000,
  "dayLow" : 2402.29000000,
  "dayHigh" : 2427.14000000,
  "yearHigh" : 2452.37800000,
  "yearLow" : 1299.00000000,
  "marketCap" : 1602411692032.00000000,
  "priceAvg50" : 2187.98320000,
  "priceAvg200" : 1915.57230000,
  "volume" : 1881168,
  "avgVolume" : 1499530,
  "exchange" : "NASDAQ",
  "open" : 2404.49000000,
  "previousClose" : 2429.89000000,
  "eps" : 75.04000000,
  "pe" : 32.11780500,
  "earningsAnnouncement" : null,
  "sharesOutstanding" : 664868012,
  "timestamp" : 1619825446
} ]

Good luck everyone! I am looking forward to everyone’s answers to this App Challenge.

Day 23-StockPickerD2

  • Day2 of the StockPickerChallenge
  • May 1, 2021

Steps I have taken so far

  1. Use the recipeList app as a template
  2. Set up groups:
    a) MVVM
    b) Data
    c) Services
    d) Extensions
  3. Copy over from recipeList these files
    a) RecipeModel.swift → StockModel.swift
    b) DataServices.swift
    c) recipes.json → stocks.json
    d) add json data from the three stocks above
    e) RecipeListView → StockListView
  4. Create Stock.swift
    a) Be careful not to mistype any of the names in the json or it won’t work!
  5. Modify the DataServices.swift to work with the new stocks.json file
  6. Create Views
    a) contentView → StockListView
    b) StockInfoView

I decided to keep using the @EnvironmentObject var model:StockModel so it is important to modify the App.swift file to include the .environmentObject(StockModel) This took me a while to remember. It kept complaining about a type error.

@main
struct StockTrackerChallengeApp: App {
    var body: some Scene {
        WindowGroup {
            StockListView().environmentObject(StockModel())

        }
    }
}

This really just gets us to the point where we can start building the interface using the data from the json file. Once we are happy with the interface we can go back and rewrite the DataServices.swift to read from an Array of our choosing and then save that array to Defaults. Ideally I would save it to core data but I haven’t learned that yet. :slight_smile:

Trailing Zeros

Those trailing zeros are really ugly. I found this extension on stackoverflow that extends double and add a function that will remove the extra zeros.

import Foundation

extension Double {
    func removeZerosFromEnd() -> String {
        let formatter = NumberFormatter()
        let number = NSNumber(value: self)
        formatter.minimumFractionDigits = 0
        formatter.maximumFractionDigits = 16 //maximum digits in Double after dot (maximum precision)
        return String(formatter.string(from: number) ?? "")
    }
}

With this you can add Text elements to a view like this

Text(" $ \((r.price).removeZerosFromEnd())")

Conditional modifiers!

Learned another new thing in swift.

.foregroundColor((r.change < 0) ? .red : .green)

TODO

  • add a + symbol to link to a function to add a new stock.
  • add a function that will download a new stock
    • append added stock to stock array.
  • add a popup to specify which ticker symbol to download
  • delete a stock using a touch gesture drag to the right
  • save array for future sessions
1 Like

Day-24-stockPickerD3

  • Day 3 of the StockPickerChallenge
  • May 2, 2021

add a + symbol to link to a function to add a new stock.

.navigationBarTitle("Your Stocks")
    .toolbar {
            ToolbarItemGroup(placement: .navigationBarTrailing) {
                Button("+") {
                  self.showingAlert.toggle()
                }
            }//ToolBargroup
    }//toolbar

add a function that will download a new stock

This was considerably more challenging as it involves the Apps architecture. It would make sense that this function should be part of the DataServices.swift file but that is currently decoding my local json (in app) file with a few example Stocks. And the StockModel.swift then grabs that data and sets it to an array of Stocks.

Perhaps I could still put this function in dataServices but I have it currently in StockModel so that I can just call it directly from model in my views.

func getRemoteData(ticker: String)  {
        //let ticker = "OTTR"

        // Set up url with ticker variable
        let url = URL(string: "https://financialmodelingprep.com/api/v3/quote/\(ticker)?apikey=0f5eedfec854e23eb12dc71fbaa4dab7")

        //create the url request
        var request = URLRequest(url: url!)

        // this code is from the example they provided from the API and returns data.
        request.addValue("application/json", forHTTPHeaderField: "Accept")
        let task = URLSession.shared.dataTask(with: url!) { data, response, error in
            guard error == nil else {
                print(error!)
                return
            }//Guard
            guard let data = data else {
                print("Data is empty")
                return
            }//Guard

          // process the data from the url request as we would from file and append to [Stocks] array
            do {
                // decode data with a JSONDecoder
               let decoder = JSONDecoder()
               //
                //pass in type
                do {
                    let stockData = try decoder.decode([Stock].self, from: data)
                    // add unique IDs
                        for r in stockData {
                            r.id = UUID()
                            print(r.name)
                        }//for

                        // Return the stocks
                    DispatchQueue.main.async { // required to run on the main thread to execute this.
                        self.stocks = self.stocks + stockData
                    }
                } catch {
                    print(error)
                }//do-catch


        }

        }//task
        task.resume()


    }

I spent a lot of time realizing that the URLSession.shared.dataTask already gives us a data variable that we can use directly in the JSONdecoder. I kept trying to convert the json into a Data object, which apparently I already had. :confused:

append added stock to stock array.

Turns out if you want to modify an environmentObject you have to run it on the main thread so I had to wrap this modification in a DispatchQueue.main.async block

DispatchQueue.main.async { // required to run on the main thread to execute this.
     self.stocks = self.stocks + stockData
 }

add a popup to specify which ticker symbol to download

I really wanted to include an alert and @Chris_Parker has a great solution.

Chris Parker’s swiftUI alert

I went ahead and just made an if else statement that either shows the popup or the list of stocks.

TODO

  • Why is the textEntered not updating unless done twice?
    • I needed to add the model environmentObject to the CustomAlert View and then run the model.getRemote function from there and it updated as expected.
  • delete a stock using a touch gesture drag to the right

Day-25-StockPickerD4

  • May 3, 2021
  • Day 4 of the StockPickerChallenge

delete a stock using a touch gesture drag to the left

I learned so much while implementing this. It is super easy to make a editable list and add the option to move items around in a list. SwiftUI pretty much gives this to us for free.

The following modifiers can be attached to a ForEach block

  • .onDelete(perform: deleteItems)
  • .onMove(perform: move)

My List didn’t have a ForEach block so I had to change

List(model.stocks) { r in

}

to

List {
                ForEach(model.stocks, id: \.self) { r in  //requies that model.stocks conforms to Hashable

                }//ForEach
                .onDelete(perform: deleteItems)
                .onMove(perform: moveItem)

      }

This caused an error that the Stock.swift Model had to conform to Hashable for this to work. And it turns out this can’t be done automagically if the Stock Object is a class instead of a struct.

In order to add Hashable to Stock.swift I had to add the following two functions

  • ==
  • hash
class Stock: Identifiable, Decodable, Hashable {
    static func == (lhs: Stock, rhs: Stock) -> Bool {
        return lhs.id == rhs.id

    }
    func hash(into hasher: inout Hasher) {
        hasher.combine(ObjectIdentifier(self))
    }

    // will decode what we want to decode
    var id:UUID?
    var symbol:String
    var name:String
    var price:Double
    var changesPercentage:Double
    var change:Double
    var dayLow:Double
    var dayHigh:Double
    var yearLow:Double
    var yearHigh:Double
    var open:Double
    var timestamp:Int

}

With that everything just automagically works!

Adding the red/green rectangle

ZStack {
              Rectangle()
                  .foregroundColor((r.change < 0) ? .red : .green)
                  .frame(width: 70, height: 20, alignment: .trailing)
              Text(" \(r.change.removeZerosFromEnd())")
                  .foregroundColor(.white)
                  .bold()

}

This pretty much finishes the basic requirements for the challenge but there are so many missing features yet. I have decided to model my app after the Stocks app that we all have on our phones as default.

Additional Features

  • refresh button pull down if possible
  • Chart of last day or week or couple days of change.
1 Like

Day-26-StockPickerD4

  • May 6, 2021
  • Day 5 of the StockPickerChallenge

Refresh button pull down if possible

This apparently has not been added yet and has to be coded. I tried to implement it with what I found here: how-to-making-pure-swiftui-pull-to-refresh but it doesn’t seem to be very easy to add to my code. I suspect that this will be added after WWDC so I won’t fret about it for now and make a refresh button. It was really the backend that I wanted to figure out how to do anyway.

  • How do you update each stock. If we owned the API or had the backend we could do a bulk udpate but since we don’t and have to use one stock at a time I will have to do a loop through each of the Stocks and update them one by one.

If they do add an onPull(perform: refresh) operation, it will be really easy to just put the refresh function in it later.

For the charts, I learned how to use the swift package manager

Swift Package Manager (swiftPM)

  1. click on the app name and you will have several tabs you can choose from. This is the same area where you can set the iOS Deployment Target.
  2. Click on the Swift Packages Tab
  3. Click on the + under the Packages.
  4. Enter the github repo for the package.

That’s it!

So I added a package called SwiftUICharts. It is still rudimentary but looks like they are going to be coming out with a version 2 soon. The nice thing about the line chart form this package is that it will take in an array of numbers and draw the chart for you. I have a simple mockup using an array I randomly generated. I need to add the code that pulls the day or week change in value for each stock ticker.

Once I have these two functions implemented I am going to go back to the tutorials for a bit. Though looks like I may have trouble with iOS foundations Module 5 as I had to update to XCODE 12.5 since I had updated my phone to 14.5.

2 Likes

Day-27-StockPickerD4

  • May 7, 2021
  • Day 6 of the StockPickerChallenge

For those readers paying attention you will notice that my dates aren’t consistent with the Day of my 100 days and that is because I don’t always get an opportunity to code every day. And I want this to reflect what I accomplish in 100 days that I am actually coding.

Today I tackled the refresh all stocks button.

Refresh Button

I put the refresh button in the same toolbar group as the EditButton()

For each stock in the model run the getRemoteData function for that stock.symbol

ToolbarItemGroup(placement: .navigationBarTrailing) {
        Button("Refresh") {
            for stock in model.stocks {
                model.getRemoteData(ticker: stock.symbol)
            }
            }

        EditButton()

}

Of course for that to work properly we have to modify the getRemoteData function

getRemoteData() function

  • Check to see if stock symbol is already present
  • if present replace stock data at the correct position in the stock array with new data.
  • if not present append to stock array
func getRemoteData(ticker: String)  {
        //let ticker = "OTTR"

        // Set up url with ticker variable
        let url = URL(string: "https://financialmodelingprep.com/api/v3/quote/\(ticker)?apikey=myNewShinyAPIKey")

        //create the url request
        var request = URLRequest(url: url!)
// had to add a stockSymbols varaible here
        var stockSymbols = [String]()  // store all the stock symbols

        // this code is from the example they provided from the API and returns data.
        request.addValue("application/json", forHTTPHeaderField: "Accept")
        let task = URLSession.shared.dataTask(with: url!) { data, response, error in
            guard error == nil else {
                print(error!)
                return
            }//Guard
            guard let data = data else {
                print("Data is empty")
                return
            }//Guard

          // process the data from the url request as we would from file and append to [Stocks] array
            do {
                // decode data with a JSONDecoder
               let decoder = JSONDecoder()
               //
                //pass in type
                do {
                    let stockData = try decoder.decode([Stock].self, from: data)
                    // add unique IDs
                        for r in stockData {
                            r.id = UUID()
                            print(r.name)
                        }//for

                        // Return the stocks
///Modified this block of code
                    DispatchQueue.main.async { // required to run on the main thread to execute this.

                        for stock in self.stocks {

                            stockSymbols.append(stock.symbol)
                        }
                        if stockSymbols.contains(ticker) {  // Check to see if the symbol already exists and if so update it
                            self.stocks[stockSymbols.firstIndex(of: ticker)!] = stockData[0]
                        } else {  //otherwise add it to the stocks
                        self.stocks = self.stocks + stockData
                        }//IFELSE block

                    }//DispatchQueue
///Modified block of code above
                } catch {
                    print(error)
                }//do-catch


        }

        }//task
        task.resume()


    }

Refresh works now! :slight_smile: I will work on the chart perhaps tomorrow morning.

1 Like

its so refreshing to see you post stuff that I can actually understand lol! I got into this just a few months before @Chris2 started the SwiftUI revamp and I haven’t seen a reason to go back and learn it yet, so most of it is still greek to me lol! but this! fetching data I can read and help with… lol not that you needed help this time

Thanks @Pagasi, That makes so much sense. I was wondering why so few people were commenting on my journal. It is definitely worth learning swiftUI. I spent quite a bit of time learning UIKit and I don’t regret it in the slightest but there is so much functionality gained from swiftUI. The interface is so much easier to write and have it look polished without having to worry about constraints for a view or a particular model of phone or ipad etc.