Loading EnvironmentObject for Switching Tabs Programmatically

Hi, I had a question regarding EnvironmentObject and programmatically switching tabs. I have an EnvironmentObject upon which two views depend and each view has its own tab within a TabView. On the first tab, I intend on having a button that directs the user’s screen directly to the second tab via a selectedTab binding (the code is:

Button {
   selectedTab = 1
} label: {
// Some Label
}

with selectedTab being the Binding. However, when it redirects to the secondTab, none of the elements dependent on the environmentObject are loaded in. I have @EnvironmentObject var model: Manager initialized on each of my views and .environmentObject(Manager()) on the launch, so I don’t think it’s the syntax or anything. I think it might be because the user doesn’t click on the second tab so the elements aren’t loaded, but I’m not sure.

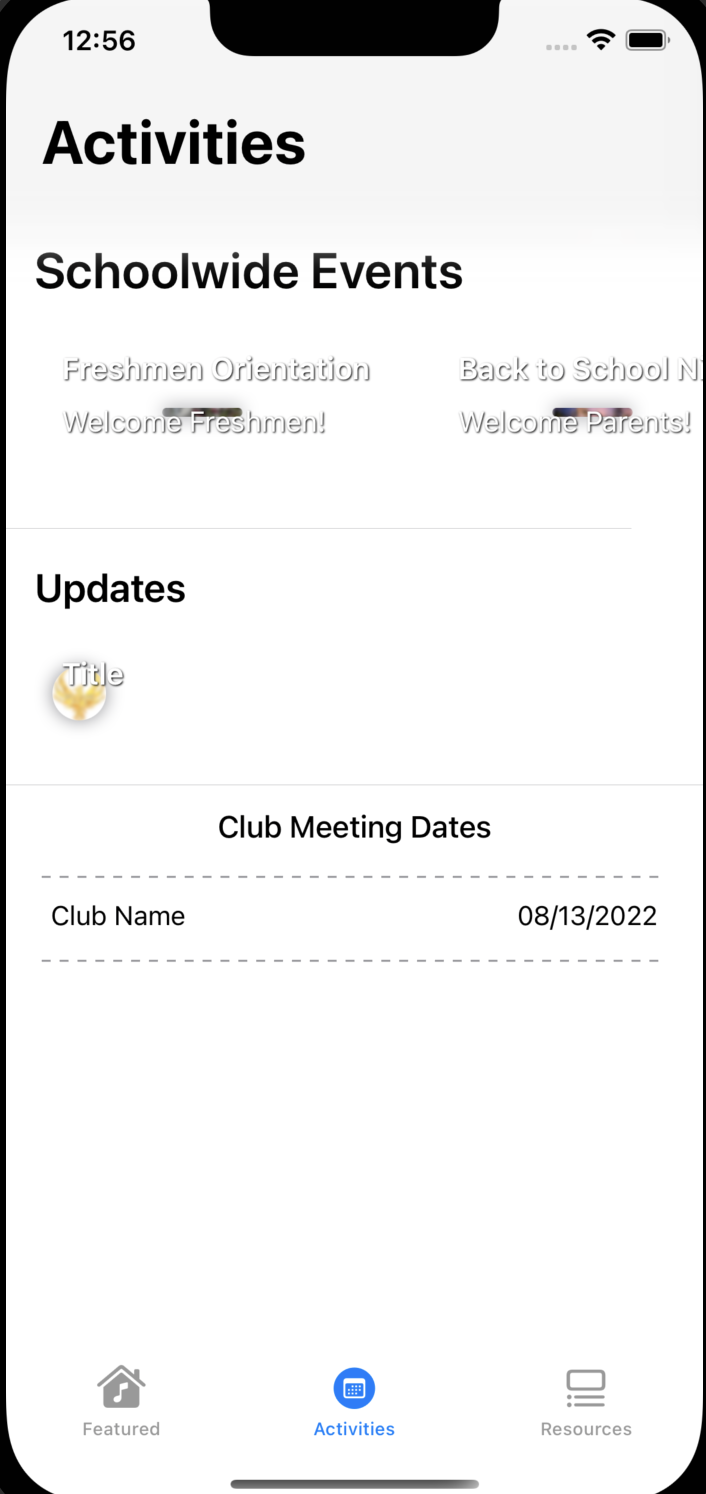
Here’s what it looks like after I click the second tab manually:

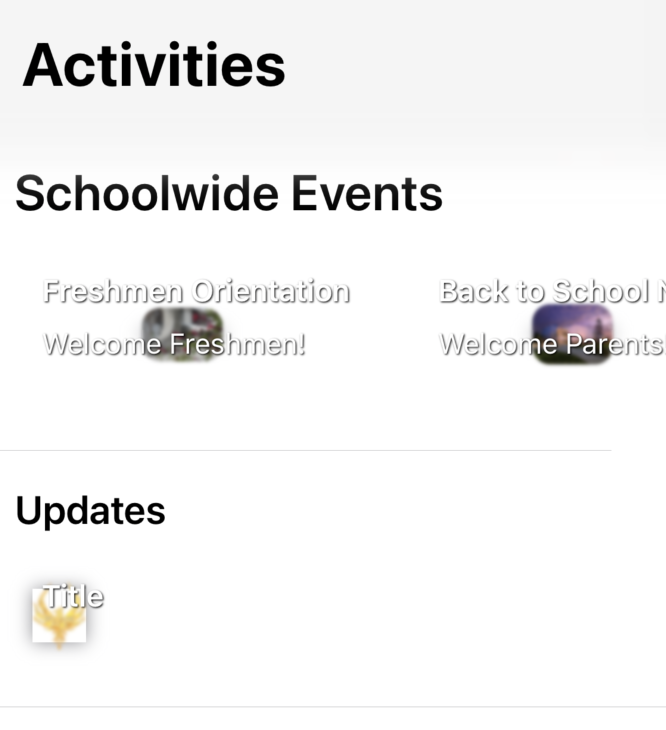
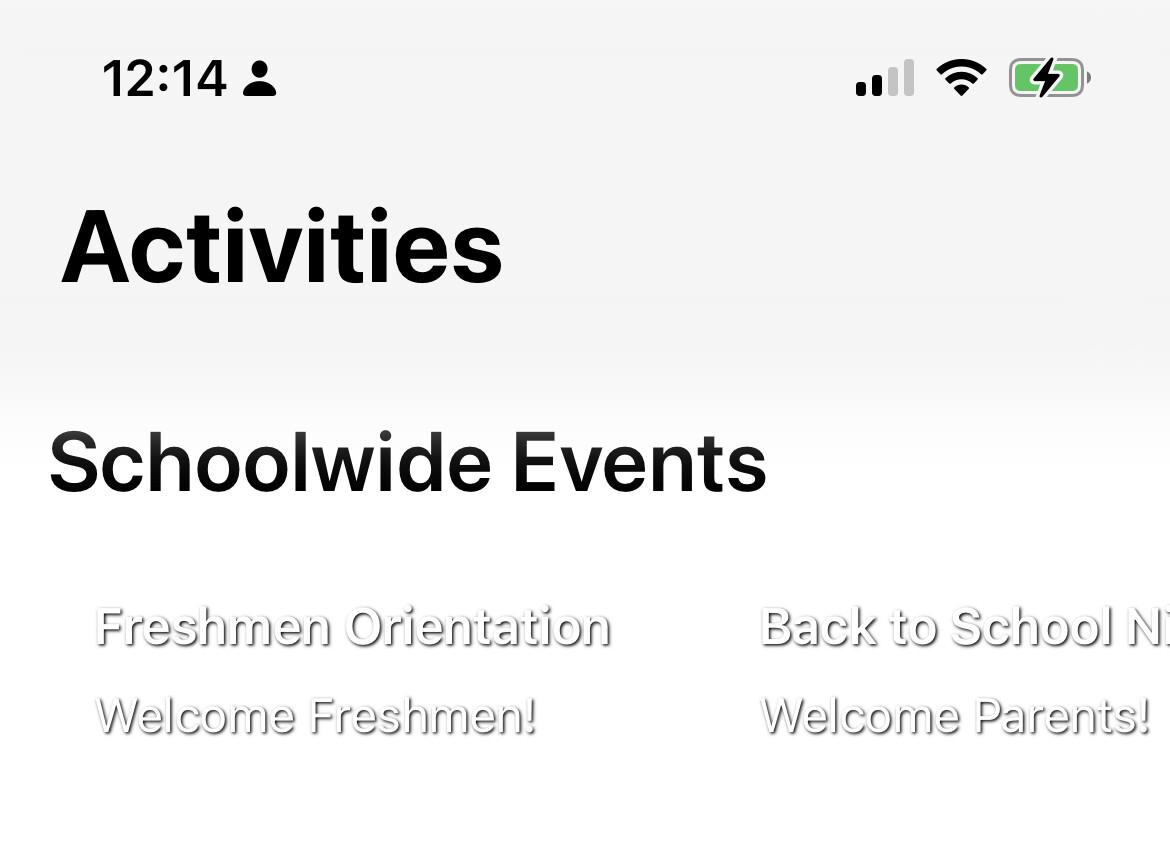
And here’s what it looks like after I click the button on the first tab without clicking the second tab yet:

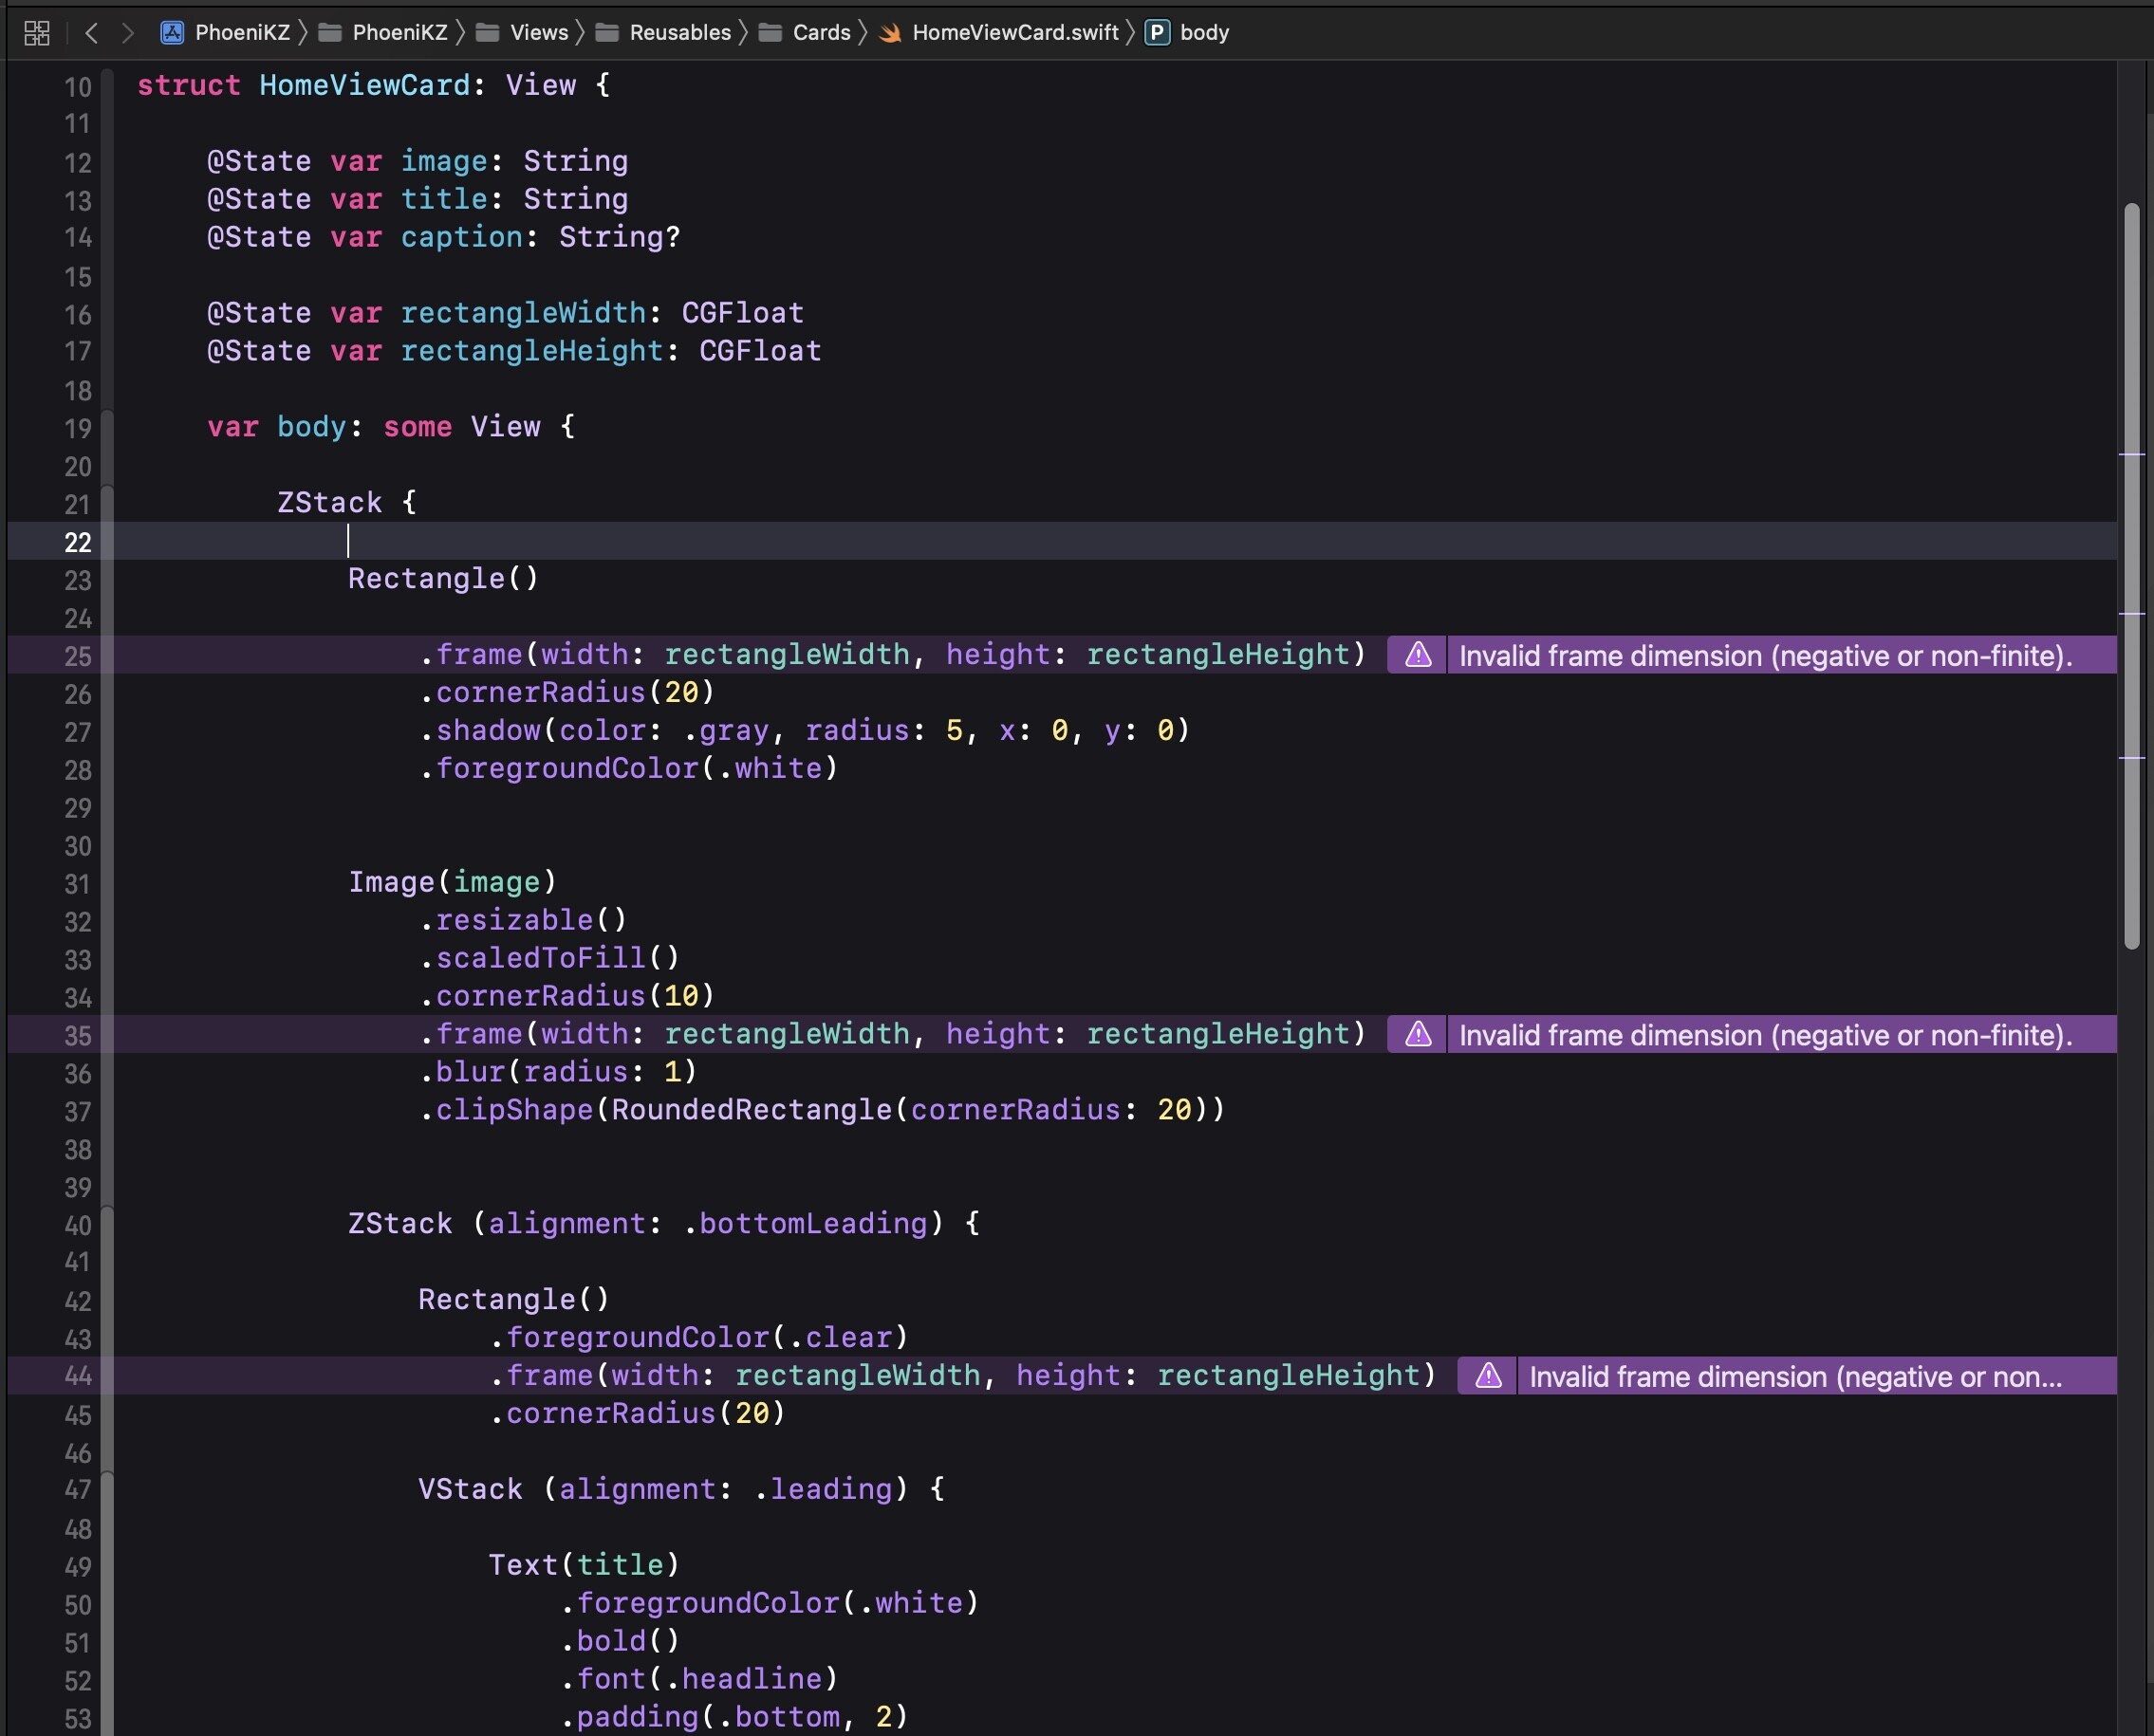
Here’s the code that’s supposed to display the first image (Activities View):

VStack (alignment: .leading) {
                            
                            Text("Schoolwide Events")
                                .font(.title.weight(.semibold))
                                .padding(.horizontal)
                            
                            ScrollView (.horizontal, showsIndicators: false) {
                                
                                HStack {
                                    
                                    ForEach(model.events) {
                                        event in
                                        NavigationLink {
                                            EventDetailView(title: event.title, caption: event.caption, image: event.image, location: event.location, time: event.time, contact: event.contact, description: event.description)
                                        } label: {
                                            HomeViewCard(image: event.image, title: event.title, caption: event.caption, rectangleWidth: (geo.size.width+90)/2, rectangleHeight: (geo.size.width-10)/2)
                                                .padding(.leading)
                                                .padding([.bottom, .top, .trailing], 10)
                                        }
                                        .accentColor(.black)
                                    }
                                    
                                }
                            }
                        }

Thanks for the help! I really appreciate it :slight_smile:

@BananaNinja

It would help if you showed your code that make each View so that we can see what you are doing.

Paste your code in as text, rather than providing a screenshot.

To format the code nicely, place 3 back-ticks ``` on the line above your code and 3 back-ticks ``` on the line below your code. Like this:

```
Code goes here
```

The 3 back-ticks must be the ONLY characters on the line. The back-tick character is located on the same keyboard key as the tilde character ~ (which is located below the Esc key - QWERTY keyboard).

Alternatively after you paste in your code, select that code block and click the </> button on the toolbar. This does the same thing as manually typing the 3 back ticks on the line above and below your code.

This also makes it easier for anyone assisting as they can copy the code and carry out some testing.

As a general rule, you should inject the .environmentObject(Manager()) into the parent View of your App so that the child Views can gain access to it by specifying @EnvironmentObject var model: Manager in each case.

In the case of a TabView App, you can inject it by adding the modifier .environmentObject(Manager()) to the closing brace of the TabView like this (for example):

struct ContentView: View {

    var body: some View {
        TabView {

            ViewOne()
            .tabItem {
                Image(systemName: "pencil")
                Text("Tab 1")
            }

            ViewTwo()
            .tabItem {
                Image(systemName: "star")
                Text("Tab 2")
            }

        }
        .environmentObject(Manager())
    }
}

or you can add it to the View that conforms to App like this example:

@main
struct TabDemo: App {
    var body: some Scene {
        WindowGroup {
            ContentView()
                .environmentObject(Manager())
        }
    }
}

Using the example above, the ViewOne code would access the Manager (View Model) like this:

struct ViewOne: View {
    @EnvironmentObject var model: Manager

    var body: some View {
        ZStack {
            Color(.systemRed)
                .edgesIgnoringSafeArea(.top)
            VStack {
                Text("Tab 1")
                Text("Hello, world!")
                    .padding()
            }
        }
    }
}

and ViewTwo would access it in the same way:

struct ViewTwo: View {
    @EnvironmentObject var model: Manager

    var body: some View {
        ZStack {
            Color(.systemYellow)
                .edgesIgnoringSafeArea(.top)
            VStack {
                Text("Tab 2")
                Text("Hello, world!")
                    .padding()
            }
        }

    }
}

Hi Chris,

Yes, I can show the code; sorry, I thought the general description would work. However, there are a lot of reusable views that my code uses, so do you think it would just be easier to take a look at the source code on GitHub? The project is in a public repository; here’s the link:

It honestly might be easier to download the project there instead of trying to rewrite a test scenario so you can see exactly what’s happening on the ActivitiesView.

If you do download it, to replicate my issue, simply run the app in a simulator and after it loads in HomeView (tab: 0), click the “See all Events” button before hitting the ActivitiesView (tab: 1). However, if you click ActivitiesView first, all the elements appear just fine. It’s only when I programmatically switch tabs does the problem appear like the second screenshot. The code in question is going to be Views → ActivitiesView → //MARK: - Schoolwide Events Scroll and Views → HomeView → //MARK: - Events Scroll. The assets and everything should be there.

Thank you!

I suspect that this is where the problem lies but I will get a chance to have a closer look at it tonight.

My timezone is GMT + 8.

Okay, that makes sense. I think that was the issue as I tried adding

.frame(width: abs(rectangleWidth), height: abs(rectangleHeight))
.frame(maxWidth: UIScreen.main.bounds.width, maxHeight: UIScreen.main.bounds.height)

to ensure it isn’t negative or non-finite but although the error doesn’t appear anymore, here’s what the view looks like:


And now I am even more confused haha… Any idea why the maxWidth and maxHeight frame or the abs modifier for the existing frame made the rectangle and image small? Many thanks.

@BananaNinja

Hi Kaden,

The solution I have found is to do this in the HomeViewCard.

Give the rectangleWidth and rectangleHeight an initial value. ie:

    @State var rectangleWidth: CGFloat = 0
    @State var rectangleHeight: CGFloat = 0

That solved the issue with the HomeViewCard not rendering with a background image no matter if you select the Activity View by tapping the Button or by selecting the Tab.

BUT… that, of itself, did not get rid of the warning “Invalid frame dimension (negative or non-finite).” because for whatever the reason I think the value being passed to the View is at some point going negative and then positive when the View finally renders. I can’t be sure.

Converting the values to absolute values solves that for the most part so that the View then looks like this:

struct HomeViewCard: View {
    
    @State var image: String
    @State var title: String
    @State var caption: String?
    
    @State var rectangleWidth: CGFloat = 0
    @State var rectangleHeight: CGFloat = 0
    
    var body: some View {
        
        ZStack {
            
            Rectangle()
            
                .frame(width: abs(rectangleWidth), height: abs(rectangleHeight))
                .cornerRadius(20)
                .shadow(color: .gray, radius: 5, x: 0, y: 0)
                .foregroundColor(.white)
                
            
            Image(image)
                .resizable()
                .scaledToFill()
                .cornerRadius(10)
                .frame(width: abs(rectangleWidth), height: abs(rectangleHeight))
                .blur(radius: 1)
                .clipShape(RoundedRectangle(cornerRadius: 20))
            
            
            ZStack (alignment: .bottomLeading) {
                
                Rectangle()
                    .foregroundColor(.clear)
                    .frame(width: abs(rectangleWidth), height: abs(rectangleHeight))
                    .cornerRadius(20)
                
                VStack (alignment: .leading) {
                    
                    Text(title)
                        .foregroundColor(.white)
                        .bold()
                        .font(.headline)
                        .padding(.bottom, 2)
                        .shadow(color: .black, radius: 0.5, x: 0.5, y: 0.5)
                    
                    if caption != nil {
                    Text(caption!)
                            .font(.callout)
                            .foregroundColor(.white)
                        .shadow(color: .black, radius: 0.5, x: 0.5, y: 0.5)
                    }
                }.padding(.leading, 15)
                 .padding(.bottom, 20)
            }
        }
    }
}

Hi Chris,

Thank you for your response. So I’ve been testing out different things whether it be editing the GeometryReader in HomeView or implementing your code (literally copy and pasting it into HomeViewCard without modifying any of the other files), but I haven’t been able to produce a successful solution. With the code above (adding initial values for rectangleWidth and Height & using abs()), the view looks like:

Would the problem potentially be in the frame values? Or did the problem resolve itself when you implemented your code above? Sorry for the trouble, I really have no clue why this is happening. My HomeViewCard is exactly as your code above.

Hi Kaden,

Oddly enough if I delete the App from the simulator and then reinstall it from Xcode the same problem recurs so clearly my “solution” is no solution at all.

Back to the drawing board.

I’ll see what I can come up with.

@BananaNinja

OK I think I have come up with a solution.

Here’s a link to the modified project in a zip file. I thought this might be the easiest way to give you a working project rather than pasting in the Views containing the updated code.

Views edited:

  • HomeViewCard

and the each of the Views calling HomeViewCard which are:

  • HomeView
  • ActivitiesView
  • ResourcesView

Link: Dropbox - PhoeniKZ-main.zip - Simplify your life

1 Like

Oh, it works! Thank you so much. What did you do to change it so in the future I might get more of a lead on how to fix a similar problem?

@BananaNinja

I should say at the outset that the way you are configuring the image frame is probably not the best way to go about it since the images have a different width to height ratio and you are trying to make the HomeViewCard cater for both ratios. In so doing your idea of passing in a calculated value based on the screenWidth means that you’ve had to come up with some offset “values” to add or subtract from the screenWidth before dividing it by 2.

I haven’t changed that idea, just passed in the offset “values” on their own to HomeViewCard where the same calculation is performed using a computed value for the screenWidth.

You can see that in HomeViewCard rather than having rectangleWidth and rectangleHeight I changed that to widthOffset and heightOffset respectively.

I removed the GeometryReader from HomeView since now it serves no purpose.

The call sites for HomeViewCard now reflect the change of parameter names. ie for example:

HomeViewCard(image: event.image, title: event.title, caption: event.caption, widthOffset: 75, heightOffset: -25)

I hope the rest of the code is self explanatory.

As to the question of a better way to set the frame size, I am not sure.

One thing that I have noticed is that there is a difference in frame size for your Phoenix image from HomeView to ActivitiesView and ResourcesView. I think you need to maintain some consistency in size. Similarly there is a slight difference in the frame size for the Events in HomeView to ActivitiesView.

1 Like

Got it, thank you! I appreciate your help very much. :slight_smile: