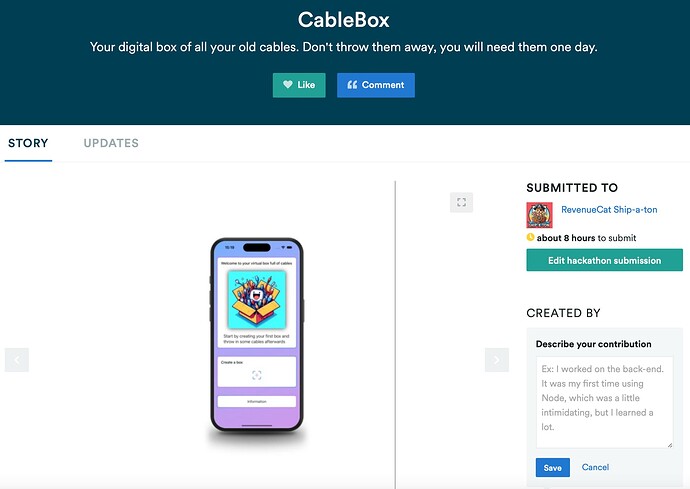
Wildsparrow's RevenueCat Ship-a-ton BuildInPublic

When I was reading Chris’ announcement that he will participate in the RevenueCat’s Ship-a-ton, I thought that I should join that hackathon, too :slight_smile:

So, here is my journal. I’ll update it regularly and would like to hear your feedback on this journey :slight_smile:

Today, I’ll write about the general thinking of an app for this hackathon, and in the coming days, I’ll get more precise and into details.

Generally speaking, the deadline (September 19th, 8:45 am) is quite tight, considering that I work a “normal” job and spend time learning Swift in my free time. Plus, the deadline means that Apple has to accept the app, which will get the deadline even closer to today. And finally, I’ll be on vacation in September, which means … the app has to be ready even earlier.

Luckily, in the last couple of weeks, I thought about 9 simple but helpful apps, of which 2 of them I already released in the app store. That means, I have a good idea what I need to provide during the app review process so that the app will be released without too much hassle. On the other hand, that leaves 7 app ideas for me to choose for this hackathon.

Considering that I would need to develop an app with a paywall, I judged my app ideas for complexity for me and for usefulness for the user. I think, I came up with a great idea! Considering the complexity, it should be doable in two weeks if I spend an hour or two in the evening, and some more hours on the weekend. Although I like using Figma to design an app, I’ll try to skip this step this time.

My schedule is:
Day 1: Define all requirements of my app idea. Sketch the overall design and how different views are related to each other. Where should the user see something, where should he add/delete something, how will the user navigate through the app.
Day 2: Do some prototype views in Xcode. I find it helpful to sketch the first ideas in the preview to get a better feeling of dimensions. Usually, I’ll find some limitations which are not obvious when thinking of the app.
Day 3: Create the required views (just the files) and models /classes in XCode. Refine the prototype views and give them some functionality (still hardcoded).
Day 4: Create assets. I’ll need a lot …
Day 5: More assets, and some more UI design ideas in XCode.
Day 6: Start coding. Transfer the already hardcoded code into a more flexible code which handles the data the user can input.
Day 7: More coding …
Day 8: You guessed it, more coding.
Day 9: Test the app and make sure that all eventualities are covered (i.e. user deletes all data, user enters “wrong” data, user enters only partialy data, user enters too much data, …)
Day 10: Learn how to implement RevenueCat
Day 11: Implement RevenueCat
Day 12: Test RevenueCat
Day 13: Add the final tweaks to the app.
Day 14: Create screenshots, app icon, app description and upload everything for app review.
Day 15-17: Wait and hope …
Day 18: Finish the entry of the hackathon.
Day 19 and following: Enjoy vacation.

Things I will need to learn and/or use:

  • SwiftData
  • Data filtering
  • Lists
  • NavigationStacks
  • Access to photo library
  • Access to camera
  • GroupBox
  • Sheets
  • Alerts
  • Animation
  • RevenueCat
  • Inkscape (to create assets)

#BuildInPublic #Shipaton

1 Like

Day 1:
I like sketching my ideas on my iPad. I can quickly write down my ideas, scribble some text, draw some sketches, and delete / rewrite parts. I can continue whenever I have an idea and there is no limitation - if I need more space, there is more space. As my iPad is always with me, I can write anything down - and later access all my notes on my MacBook.

Below (intentionally blurred, as the content does not matter at this point in time) an example how this process looks like.

It starts with a very rough sketch of the core feature of the app. Some text below will define more details, in that case it is two classes and how they interact.
Later on, I added a rudimentary flow how the app will grow with user interaction and where a potential RevenueCat paywall could be displayed.
I then added more details of specific views, and you can see by the coloring that some “delete” features will be involved.
In the bottom part I sketched some functionality, to be more precise a search/filter functionality. At this point in time, I already define some variables and how changing one variable will affect different views (all the green stuff).

This serves as the core of my app. When I think of more features and/or how those features could be implemented, I’ll write that down. But now the app idea is fully described and I concentrate on working on my MacBook/Xcode next.

Day 2:
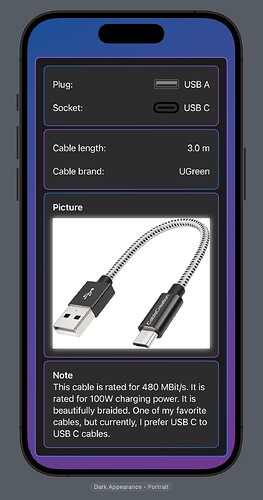
Basic design

This is not the final design, but it will be something like this.

It is composed of several GroupBox views; I like how they automatically change their color depending on dark mode/light mode and if they are stacked on top of each other. To get the desired width, I prefer to work with a spacer, which pushes the view out.

To get a more eye pleasant background, I use system colors but apply some opacity; in that case, the dark mode is not as dark, but more importantly in light mode, the background is more subtle.

To ease the transition between the picture and the dark background, I applied some white shadow, which is working quite well also with other pictures and also in light mode.

(and for the picky people: Yes, this is neither a Ugreen cable, nor is it a USB C socket, nor is it 3.0m in length :smiley: )

Day 3:
Classes and Views

Nothing fancy today, I created all required views (missing: views for RevenueCat) and set up the SwiftData classes. I also tested some filtering functionality, which I will be using for filtering items in the app.

I really like SwiftData. It is so simple to store data. My key takeaway today was that you can mark large files (i.e. pictures, videos) as @Attribute and link it to an external storage. In my understanding, Swift takes care of where to store that data and it only loads the link to the data; so it doesn’t know the data itself, meaning you can’t do anything to the data before you load it, but that is just what you want if you don’t manipulate that data before it is loaded.

So, my pictures will be stored externally, and the line of code is just
@Attribute(.externalStorage) var picture: Data?

Simple, isn’t it?

Day 4:
Assets

Today’s task was to start creating assets.
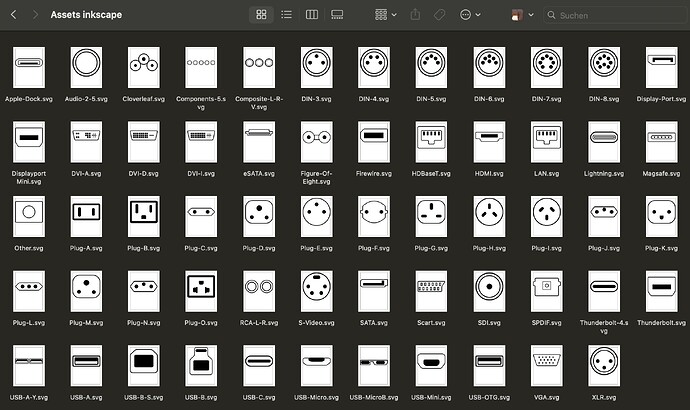
As I have never done that before, I looked up how to draw in Inkscape. After you get the idea how to draw (such as rounding edges, adding nodes, moving nodes), it’s not that complicated.

Many tutorials are based on former version (currently, Inkscape is in V1.3.2), so the design, the menu, the tools are really different and thus hard to follow. Nevertheless, there are tutorials for everything in the internet.
After all, drawing is similar to creating drawings in a CAD program. Add some maths and you can create amazing stuff. More complex shapes can be created by subtracting two shapes (path, to be more precise), which is a nice but also complex feature.

It’s a really nice program and I can recommend it to anyone who wants or needs to create vector graphics.
Luckily, I calculated 2 days for the assets, which translates to 1-2 hours today and a whole day tomorrow. Should be feasable.

Day 5:
Assets and more UI design

I could finish a big chunk of work, by creating lot’s of assets. Not yet completely finished, as those are “only” the vector graphics. I will export them as PNG in two colors, to cater for light and dark mode. As my final UI design is not yet ready, it might be too early to already define both colors.
Nevertheless I did some testing (exporting, adding to XCode), and that’s working.

I also worked on the UI of my app and I’m happy to report that the principle logic is working. I had to create one more view than initially anticipated, but that was no big deal. Some design parts are completed, which I extracted as custom modifiers and custom colors. I really like that this is quite easy in XCode, and that changes to certain design features and be controlled in one location.

Today, I struggled with some combinations of ScrollViews, Lists, ForEach loops, common VStacks etc.
Sometimes it is not working at all (nothing to see in the simulator), sometimes it is working strangely (not the expected results in the simulator), and when it is finally working (shown in the simulator as expected), I scratch my head and think to myself, why I started in a way more complicated way than the final result.
Well, I guess, more practise and this will go away.

To finish today’s post, I’ll show you my assets. As you may imagine, my app will focus on cables :wink:

Day 6
Coding

Today was not a productive day :-/ I struggled how to pass data from one view to another (again, it is not that complex, but I tend to think too complicated). I also find it hard to get the preview working if you are in subviews. My current solution is to preview the ContentView in the previews of other views, which is acceptable for the app I’m working on.

I played around with my graphics and how they behave in light/dark mode within GroupBoxes. To tweak the appearance, the modifier .contrast(Double) is quite helpful.

I think that I’m still in my schedule, although I actually wanted to be a bit further along. Let’s see what I can do the next two days. Hopefully, I can share some codes and screenshots by then.

Day 7:
Coding

Today, just a small update.
I wanted to do a ForEach loop over the items in an array, but limit the output to the first three items. I tried to do this with some if/else statements and wanted to break out of the loop, but with no success. I then wanted to create a temporary array of the original array which only holds three items, but again, no success.
Thank God, Goggle is my friend :wink: The solution is as simple as beautiful: .prefix()

ForEach(box.boxContent!.prefix(3), id: \.id) { cable in
// show something
}

As a non-native speaker, prefix is nothing which I would associate to somehow limit items. Thus, it was hard to guess a suitable modifier, though I thought that this requirement is certainly included in Swift.

My code is coming along nicely. I managed to pass the data between the views (at least till now), and I have a pretty good idea what and how I need to do next. Compared to my initial timeline, and that I can spend more time at the weekend for this project, I might need more “time” (days) the next couple of days to finish my code, but I’m still confident that the overall timeline is feasible.

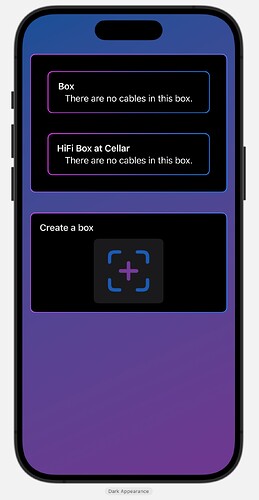
Here is another screenshot of my app, nothing fancy, but I wanted to share at least something:

Day 8:
Coding

Some more hours of coding. Looking good so far, just some trouble saving some data, but that should be solvable.
Nothing exiting, some Pickers, some Forms .

No screenshots or code to share today, but a nice XCode feature: If you loop over a ForEach and have set the id: to \.self, the output when running the simulator give you a clear warning if one (or more) of the items in the ForEach loop is a duplicate. As I re-arranged some of the items for the Picker, I had a duplicate, which I would never have spotted without that error/warning message.

Tomorrow I won’t be able to give an update, so expect my next post in 2 days.

Day 9:
App testing

The app is working as intended!

I had some headache getting the app deleting an item from an array without crashing. The strange think is, that I could easily delete an item from an array in another instance.

OK, let’s break that down:
My app is holding an array of boxes. Each box is holding an array of cables.

Deleting a box is easy. This is the very simple code in the view, showing that exact box I want to delete:

    func deleteBox() {
        modelContext.delete(box)
        dismiss()
    }

You would assume that this applies for the cable in the cable view. But it doesn’t. Although I am in the view of the single cable and I tell Swift to delete this cable … well it does delete the cable but once you navigate back to the box view, the app crashes. Adding try! modelContext.save() did not solve the issue.

I added a sheet in the box view where all cables are listet, and I then incorporated a .onDelete modifier (swipe action) to delete a cable.

 .sheet(isPresented: $showCableListToDeleteCable) {
                    
                    List {
                            ForEach(box.boxContent!, id: \.id) { cable in
                          // code to show the cables
                            }
                            .onDelete(perform: deleteCable)
                        }
                    .background(// background modification)
                        .ignoresSafeArea()
                    )
                    .scrollContentBackground(.hidden)
                  
                        Button("Cancel") {
                            showCableListToDeleteCable.toggle()
                        }
                        .buttonStyle(BorderedButtonStyle())
                        .background {
                            RoundedRectangle(cornerRadius: 4)
                                .stroke(// some stroke modification)
                        }
                    }

And the function to delete a cable (remember: an item of an array in an array)

    func deleteCable(at offsets: IndexSet) {
        for offset in offsets {
            box.boxContent?.remove(atOffsets: offsets)
            try! modelContext.save()
            showCableListToDeleteCable.toggle()
        }
    }

My to-do list:
Add RevenueCat functionality
Upload app to AppStore

it might be a long shot but does your app also crash without the sheet?

I’ve been running into tons of crashes involving sheets lately so we’ve scratched them entirely from our project

My solution with the sheet is working without issues.

I had issues with:
Array of boxes
Each box has an optional array of cables

When displaying a single cable
(Users sees: Boxes → clicks on one Box, sees the box with cables → clicks on a cable, sees the cable details)
And deleting a cable from this view, the cable is deleted, but navigating back to the view with the box with cables let the app crash.
Unfortunately, especially as I didn‘t want to (or could not) use a List view within the „box with cables“ view, I had to come up with another solution → said sheet view. The users clicks on a button to „remove a cable from this box“, the sheet pops up, the users swipes the cable to the left which he wants to delete, the cable is deleted, the list view collapses automatically, the „box with cables“ view is presented including the update (the removed cable is not displayed anymore), and there are no crashes to the app.

Strangely, deleting a box in the „box with cables“ view and navigating back to the „boxes“ view did not result in a crash. This works perfectly fine, regardless if a button tab deletes the box immediately or if I add an alert sheet for confirmation.

I read in some discussions that some people experienced the same issue as I have experienced, and for some a viable solution was to explicitly add try! modelContext.save() , but not for all and also not for me.

So, for me, no issues with sheets and alerts. But some issues without them.

Day 10:
RevenueCat

Before jumping into RevenueCat, I created an AppIcon, cleaned up some code and did subtle tweaks on the design when the app is displayed on an iPad, iPhone Pro and iPhone SE.
AppIconSmall

I further decided to add more functionality to the app at a later point in time, but did already create some basic variables in the code. Then, testing the app, I could not find any bug caused by the changes I made today. Hooray.

I created an RevenueCat account and watched some videos how to set up everything.

Installing the dependencies via the Swift package manager was super simple.

Plan for the next day(s) is to set everything up on the Apple developer site, as well as on the RevenueCat site.

Day 11:
RevenueCat

I set up my apple developer account for paid apps, as well as linked my RevenueCat to my apple account.
There is a very well written guideline which is visible as soon as you log in to your RevenueCat account.
It heavily focuses on subscription based apps and offerings (how you can test different paywall features/designs/content); but even for one-time in-app purchases you find everything you need (though I would love to see a separate tutorial for that one-time in-app setup).

Next is to implement the paywall into my app. My next update will probably be on the weekend, as I won’t be able to work on that the next 2-3 days.

Bonus:
I can recommend ViewThatFits to tackle different screen sizes. You can wrap different views into that modifier and SwiftUI will choose the view which fits best (beginning from the top to the bottom, so the largest view should be on top). That could be Text views with different length or (in my case) an HStack:
For my layout I had to limit an HStack to a frame width of 100 so that it will be displayed nicely on an iPhone (though some text will be on multiple lines and the text may get smaller ( for example by using .lineLimit(2) and .minimumScaleFactor(0.5) ). Which is fine, unless you display that view on an iPad. Plenty of space! Easy solution: Copy&Paste the whole HStack but set the frame to a width of 200. Now, on the iPad, the text is beautifully displayed in one line and I didn’t have to figure out which device the app is running on.

In short:

ViewThatFits {
HStack { // some View }.frame(width: 200)
HStack { // some view }.frame(width: 100)
}
1 Like

Day 12:
Test RevenueCat

The paywall feature and how it is linked with the in app purchase functionality from Apple is very promising. It seems that everything is (still) working as expected.

Setting up a Paywall and displaying it in an app is easy, but the documentation from RevenueCat could be a little bit more focused. I found a part in their documentation which tells you to import Purchases but it should read import RevenueCat. Also, the Apple User ID is apparently not required, but it is still in a code sample. Lastly, there is an important part to remember if a async functionality must be used: Wrap it in a Task { } to avoid the await for other functions.
But, after a few minutes of Google, Youtube, thinking, and trying, the Paywall is popping up exactly when I want it to be displayed.

First, I check for a certain condition (if a feature requires the paid app or if this is still within the free version). If this is met, the program will go into the following clause. Else, the following if clause is completely skipped and without checking the customerInfo, I jump with the else clause into a function (the saveCable() function in below example).

   Task {
                do {
                    let customerInfo = try await Purchases.shared.customerInfo()
                } catch {
                    // handle error
                }
                // Using Completion Blocks
                Purchases.shared.getCustomerInfo { (customerInfo, error) in
                    // access latest customerInfo
                    if customerInfo?.entitlements["full"]?.isActive == true {
                        saveCable()
                    }
                    else {
                        paywallIsPresented.toggle()
                    }
                }
            }

I also did some subtle design changes, but nothing fancy.

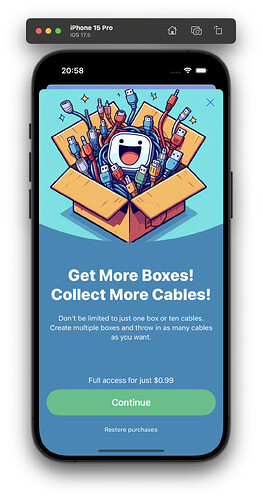
Now, have a look at my paywall :slight_smile:

In the next two days, I’ll do more testing, create the required screenshots, write my app description and upload everything for app review. Seems like this is the final spurt! (or in terms of a project maanger: “80% is done, this will be a smooth ride to the project end”)